Welcome to Squadra916

Register now to gain access to all of our features. Once registered and logged in, you will be able to contribute to this site by submitting your own content or replying to existing content. You'll be able to customize your profile, receive reputation points as a reward for submitting content, while also communicating with other members via your own private inbox, plus much more! This message will be removed once you have signed in.
gbinsb

Gbinsb - GTV V6 TB project

Hi,


I will start my project topic by showing some of the mods that we have done on the TB so far.


- Installed pressure gauge instead of the clock.

- Painted center console

- Phase 2 black leather interior

- Brembo big brake calipers from a alfa 166

- 147 GTA rear brake disk modification

- Bilstein B6 & Eibach pro springs

- HKS SSQV dump valve

- 200 cell sports cat

- Quad exhaust (home build) + ragazzon mini silencer

- RF remote control with original alarm system

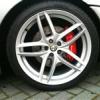
- GT cloverleaf 18" wheels

- interior ceiling refinished with alcantara

- cleaned engine bay

- Alfa 155 2.5 v6 camshafts

- Magnecor KV85 HT leads + Denso Iridium sparkplugs

- squadra chips


Foto360-4P6PTLEK.jpg


Foto550-DPTJKEHA.jpg


Foto-RJGI4YFH.jpg


Foto-ST6HKW6I.jpg


Foto550-IHLFTD8K.jpg


Foto550-4JR4NHSZ.jpg


Foto550-XMTRIYYI.jpg


Foto550-KD64TYPU.jpg


Foto550-SITTWOEH.jpg


Foto550-KR4X7EJY.jpg


Foto550-IJWBCVJU.jpg


Foto550-WHFQQDR4.jpg


Foto550-3T3QBMGC.jpg


We did many more things like general maintenance, clutch replacement and stuff like that. My new things to modify I will describe on this topic. At the moment a engine rebuild


Foto-I4JBKOOU.jpg


Share this post


Link to post
Share on other sites

147 rear brake disc modification? Tell us more about that!

I was on the go to adapt the 166 rear brake calipers with 159 rear brake discs...

Share this post


Link to post
Share on other sites

I think the easier and cheapest way is to use the 295mm brake disks from a Fiat Ulysse with the OEM gtv rear caliper.

An adapter is very simple to make..

Share this post


Link to post
Share on other sites

Great car and modifications  :thumbsup: !

What discs did you use for front brake upgrade?

I see gearbox picture, but no any related info?

Share this post


Link to post
Share on other sites

Great work so far. Love it  :thumbsup:  Is that a VDO gauge? Did you get those 155 cams new?


I think the easier and cheapest way is to use the 295mm brake disks from a Fiat Ulysse with the OEM gtv rear caliper.

An adapter is very simple to make..


Sounds like an idea :D Those discs are not vented?

Share this post


Link to post
Share on other sites

147 rear brake disc modification? Tell us more about that!

I was on the go to adapt the 166 rear brake calipers with 159 rear brake discs...


A dutch guy made some adapters for the OEM brake calipers to get a bigger offset. I used the 147 GTA rear brake discs. just for the looks :)


Foto-F3WUZG8H.jpg


Foto-QGCNFI3I.jpg


Foto550-CV4N77CP.jpg


Foto550-I8M36QZ4.jpg


Foto-YTGAAEI3.jpg


Foto550-IJWBCVJU.jpg


Great car and modifications  :thumbsup: !

What discs did you use for front brake upgrade?

I see gearbox picture, but no any related info?


Front brakes are Brembo GT sport 305mm discs from a GTV 3.0 24V. The gearbox has been opened up to replace some synchomess rings.


Great work so far. Love it  :thumbsup:  Is that a VDO gauge? Did you get those 155 cams new?


Yes its a VDO gauge, pain in the ass to install in a P1.. The 155 cams are not new, but over 20 years old :) but they look like new and after measurements they are within specs!


Yes Fabian did them on my Spider


Fabian is a very adaptive guy, he can adapt almost anything :happy0045:

Share this post


Link to post
Share on other sites

We started the disassembly couple of weeks ago. The crankshaft has been damaged a little bit. So this has been send to a specialist, just like the heads and cylinders.


Foto-PD6XMJAR.jpg


Foto-ZTTEGGXB.jpg


Foto360-BXS887J7.jpg


Foto-IL4MPELI.jpg


Foto-JC6UL6NR.jpg


Foto360-3T7BIH3D.jpg


Foto360-NY6YZBHT.jpg


Foto-IDTTNANM.jpg


Foto360-C4B3U6FL.jpg


Foto-V4HXKTOV.jpg


after this we have cleaned the engine


Share this post


Link to post
Share on other sites

So we proceeded to rebuild the engine with the refurbished parts. we cleaned the engine pretty good


Foto360-DQQUB4OF.jpg


no sludge left.


Foto-MXMWQPFV.jpg


Cleaned the pistons and rods, and installed new piston rings.


Foto360-MGOAF4VT.jpg


new valve guides, reseated the valves and flattened the gasket surface.


Foto360-RW4E33DB.jpg


Honed the cylinders.


Foto360-MANBVB4U.jpg


The crankshaft was polished and didn't need special oversized bearings, but..


Foto360-X7XHFWSS.jpg


The rods in my engine have oil sprayers in the rods.


Foto360-OA8AQDJV.jpg


The new original bearings don't have the oil hole anymore.. It seems that Alfa revised the rods in the 90's and leave out the oil spraying hole. So also the new bearing don't have the hole anymore.


Foto360-P8RI6MB6.jpg


I then bough the Glyco after marked bearings, they still have the hole :) SO now I can still use this function.


Foto-COLAJXTC.jpg


Installed the cylinders with pistons.


Foto360-HPDBCPRJ.jpg


When we installed the main bearing caps, I was a bit confused. The engine overhaul manual wrote 25nm and 79 degrease angle torque. The alfa repair manual wrote 84 - 93 nm and talked about lock nuts with 25 nm. When I disassembled the engine I didn't see any extra lock nuts, but my 2 middle bearings where not round but eclipse shape. so that was not good, probably the nuts where not tightened properly because of the confusion with a previous rebuild.


I found out that alfa used lock nuts in the past on the 164 v6 engine, but started using the angle torque on all new engines and leave the lock nuts. So that is what I did, 25 nm and 79 degrees. I measured roughly about 122 - 136 nm.


Foto360-WS7QHXKV.jpg


I started also cleaning the auxiliary parts so that we can fit the heads with nice clean parts.


Foto-ZQR4KWJG.jpg


Share this post


Link to post
Share on other sites

wow proper hardcore, fantastic work well done :thumbsup:


i am replacing my headliner, is it fairly straight forward or do i have to remove anything like the rear parcel shelf?

Share this post


Link to post
Share on other sites

0Finally after 8 years of abandoning this project, the beginning of this year I continued. It’s driving again and has MoT. I also did a A/C delete, walboro 255l fuel pump, TD05 with 16G conversion turbo, FMIC, bigger radiator, Q2 diff with enforced clutch and a AFM to MAF conversion. Now I have to dial in the bigger turbo


IMG_0302.png

IMG_0029.jpeg

IMG_1394.jpeg

IMG_0032.jpeg

IMG_1393.jpeg

FDBBBFBB-AD3B-4649-9E58-887917C74D46.jpeg

IMG_0028.jpeg

IMG_0039.jpeg

IMG_0038.jpeg

Share this post


Link to post
Share on other sites

This is really a good update to be read :), especially from performance fanatic perspective :D! Everything look very clean, not only the engine and car :D.


Why did you delete the AC ? For me personally, AC is one of the most significant option a car can have (speaking from point of almost all my driving experience done in warm months in non-working AC environment :D). I associate intentional AC delete with very seriously modified car likely intended for racing. On my other car, which have been very seriously modified, I insisted on restoring of AC system, which have missed and cut parts.

I see also likely aftermarket wastegate actuator, blow-off valve and oil cooler :)

What is intercooler's core size? What is this clutch? It is just stronger pressure plate or something more special?

TD05 from earlier 164 TB I guess? Do you know 16G compressor wheel dimensions? I prefer upgrading with something more modern, but that is much easier, if you source everything needed from 164 TB.

I wish you sooner completion and waiting for updates and impressions :thumbsup: 

Share this post


Link to post
Share on other sites

Hello Kunev,


Initially I figured that my AC lines and pump were in the way of the inter cooler and bigger radiator. So I removed the lines and all AC stuff. Replaced the AC pulley with a bigger pulley for the steering pump and fabricated the new steering pump support. I can use the standard aux belt. Afterwords I might have saved the AC, or rerouted the lines like I did with the steeringpump line. I made some room for the radiator by adjusting the support. So maybe in the future.. 


I actually don’t remember the core size of my intercooler, tube is 57mm diameter. But much bigger won’t fit nice imo.


the TD05 was from the earlier 164 correct. I had most parts, so it fitted on the stock support and 60mm downpipe exhaust. That is pretty convenient. Only thing I had to adjust was oil return pipe. Connection on the oil carter was different from my GTV and 164 engine. I rebuilded it to the 16G big compressor. Unfortunately I didn’t choose for the billet compressor wheel at that time, but that’s ok for now. Turbo is good, for at least 300hp. I used kinugawa actuator, this works perfectly, the original was gone already on my Garrett turbo. I had to fabricate my own bracket to fit the 16G compressor housing.


The blowoff valve is from HKS, and doing a perfect job. Much better than the Forge crap. And I used a Mocal oil cooler as a replacement for the Stock rusted one.


For the clutch, all I know it holds 35% more than stock. See pictures below for the difference. It has been over 8 years that I purchased it, so i don’t know the fine details anymore 

IMG_0063.jpeg

IMG_0064.jpeg

IMG_0054.png

IMG_0059.jpeg

IMG_0062.jpeg

IMG_0061.jpeg

IMG_0060.jpeg

IMG_0058.jpeg

IMG_0057.jpeg

IMG_0056.jpeg

IMG_0053.jpeg

IMG_0052.jpeg

IMG_0055.jpeg

IMG_0046.jpeg

Share this post


Link to post
Share on other sites

Great you made good progress this year!


I installed exactly the same intercooler: core is L550mm x H180mm and I think 65mm thick with indeed 57mm connecting pipes.


I used D55x1,5mm stainless pipes and bents together with 54mm silicon hoses.


I klocked the exit from the compressor much more downwards so that the intercooler pipe goes under the airco compressor and its pipes.

The pressure hose from the steeeing pump rerouted in front of the coolers (in the front bumper) to save some space.

Share this post


Link to post
Share on other sites

So now you use bigger pulley for power steering pump i.e. less rpm of it per same engine rpm, right?

That big 16G compressor wheel is significantly bigger in size than original one looking at dimensions, which you provide.

TD05 turbine wheel also must be bigger than original TB25. After quick search I found some wheel dimensions for TD05H 49/55,6mm and for T25 41,7/53mm (exducer/inducer), but not sure if they are representative and accurate for particular turbos here. Earlier 164 TB with Mitsubishi TD05H-12B must drive very differently from later ones with Garrett TB2538 :icon_rolleyes:

Share this post


Link to post
Share on other sites

Create an account or sign in to comment

You need to be a member in order to leave a comment

Create an account

Sign up for a new account in our community. It's easy!

Register a new account

Sign in

Already have an account? Sign in here.

Sign In Now


  • Recently Browsing   0 members

    No registered users viewing this page.

Welcome to Squadra916

Squadra916 is the largest international community for owners and fans of Alfa Romeo GTV and Spider 916 cars.